xVision 2 Vulkan Edition
user manual
(User manual for legacy xVision versions 1.05-1.55 you can find here).
table of contents
- 1. System requirements
- 2. How to install
- 3. First start
- 4. Initial sim resources backup
- 6. Uninstalling
- 6. Upgrade notes
- 7. What are solutions?
- 8. xVision user interface. Working with solutions
- 9. Troubleshooting
- Appendix A: Detailed list of tweaks with descriptions
1. System requirements
- Windows 7 (64-bit version) or later. Mac OS or Linux are not supported.
- Your OS should have Microsoft Visual C++ 2015 Redistributable (or later) package installed. ( https://support.microsoft.com/en-us/help/2977003/the-latest-supported-visual-c-downloads for download.)
- Installed X-Plane 11.50 - 11.51 and later, if tool will support it.
- 300+ MBytes on hard drive. SSD M2 recommended for Vulkan mode.
- Up to 1 GB RAM.
- Internet connection. (Please make sure your firewall and antivirus software are not blocking X-Plane and xVision internet access.)
2. How to install
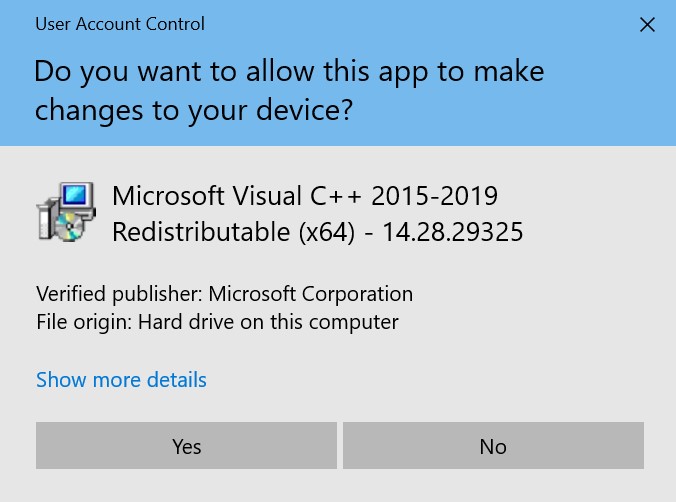
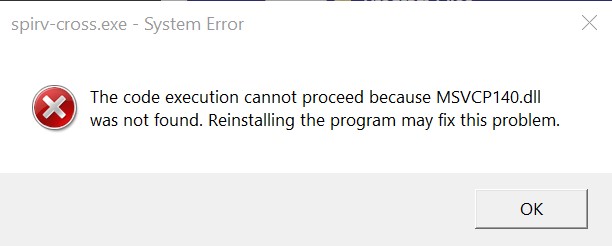
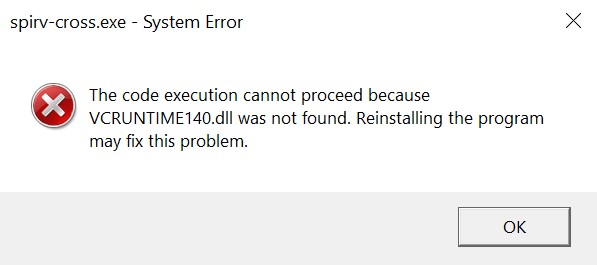
For Vulkan shaders processing your system should have installed Microsoft Visual C++ 2015 (or later) Redistributable package (64-bit) (vc_redist.x64.exe). You get "ERROR preprocessing Vulkan shader..." at first start of the tool if it's not installed on your PC. If your OS doesn't have it please download it here: https://support.microsoft.com/en-us/help/2977003/the-latest-supported-visual-c-downloads.
(Or you can use VC_redist.x64.exe file in xVision distibition archive. It's Microsoft Visual C++ 2015-2019 Redistributable (x64) 14.28.29325) for English language.)
xVision is a standalone portable application and doesn't require specific installation procedure. Just unzip the distribution archive into a separate directory which does not require administrative privilegies. xVision is not a standard X-Plane plugin and you needn't install it into Plugins directory of the sim.
IMPORTANT! Please not start tool directly from archive. You should extract files first!
xVision 2.00 works ONLY WITH X-PLANE 11.50-11.51 and requires separate installation from all other xVision versions.
Solutions created for legacy xVision versions may be uncompatible with xVision 2.00+ or may produce different visual results.
IMPORTANT NOTE!Solutions applying in Vulkan mode takes a lot of time. We strongly recommend to add the entire X-Plane directory or \Resources\Shaders\ directory and your xVision 1.20+ directory in exceptions list of your antivirus software (including built-in Windows defender).
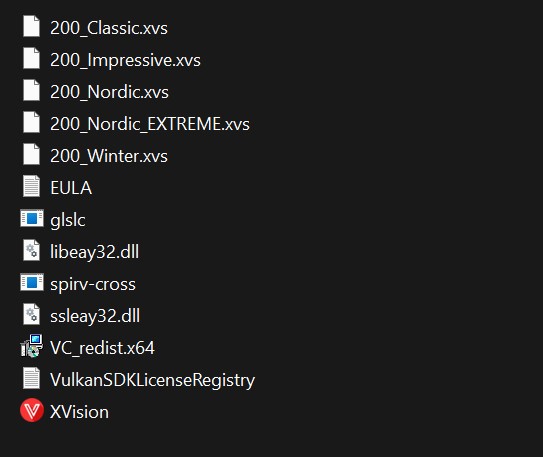
Each distribution package is a zip archive containing the following files:
- XVision.exe - application.
- EULA.txt - End User License Agreement text.
- 200_Classic.xvs - ready "Classic" solution.
- 200_Impressive.xvs - ready "Impressive" solution.
- 200_Nordic.xvs - ready "Nordic" solution.
- 200_Nordic_EXTREME.xvs - "Nordic" solution variation for using on powerful PCs.
- 200_Winter.xvs.xvs - "Winter" solution.
- glslc.exe, spirv-cross.exe - auxiliary utilities by LunarG Inc. for Vulkan shaders processing.
- VulkanSDKLicenseRegistry.txt - License information for Vulkan SDK.
- libeay32.dll, ssleay32.dll - OpenSSL library files.
3. First start
Before starting the tool please make sure that:
- You have all original X-Plane 11 shaders in sim. Tweaked or modified shaders can't be used by xVision and will be ignored (warnings will be displayed in the program log). In this case just put the original version of shader in sim and tool will catch them at next start.
- Your firewall and antivirus software are not blocking xVision internet access.
How to start using xVision:
1. Start file xVision.exe from installation directory.
2. Read EULA and accept it.
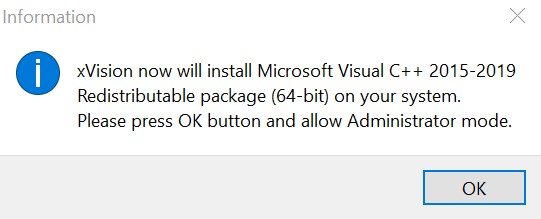
3. At first start the tool automatically checks if Microsoft Visual C++ 2015-2019 Redistributable (x64) is installed on your system. If it's not present automatically installs it.
You will be informed about it by message dialog. Please press OK and let xVision in administrator mode install required modules.


5. Put your activation key in xVision activation window (you can also copy-paste it from Simmarket account or e-mail to avoid typos) and press "Activate" button. You'll get "Activation successful" message.
6. Main xVision window appears. xVision starts backup creating and Vulkan shaders preprocessing. This takes quite a lot of time: please be patient.
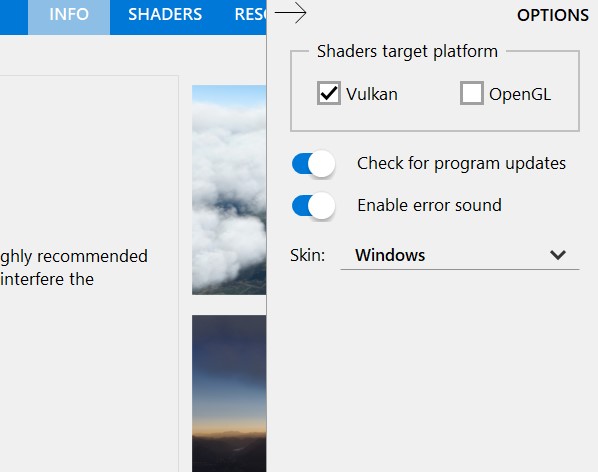
7. By default the tool sets desired shaders target as "Vulkan". Open "Options" panel by using "Gear" button at top-right window panel and select the desired target(s). This setting will autosave for the next start.
8. Now you need to apply the desired solution. Press Ctrl-O or Open button on the left sidebar to load it. (Answer "No" to save initial solution.). Open, for example, 200_Impressive.xvs solution file. Solution is loaded.
9. Apply loaded solution to sim: press F9 or Apply button on a left sidebar. IMPORTANT: You have to do it when X-Plane IS NOT RUNNING.
10. Please check program log that your solution is applied succesfully (no ERROR messages there).
11. After applying solution start X-Plane. At first start after shaders alterations X-Plane will re-compile shaderes, it takes extra time.
4. Initial sim resources backup
The first time you run the tool, it will ask you the main X-Plane installation directory, automatically detect target X-Plane version, find the appropriate resources, shaders, plugins and shaders cache directory and create an initial backup of main visual resources and shaders. This backup folder is created in main xVision directory and named "BACKUP".
What resources will be backed up:
- all files from \X-Plane 11\Resources\bitmaps\skycolors\ directory will be copied to \xVision\BACKUP\Resources\bitmaps\skycolors\
- all files from \X-Plane 11\Resources\bitmaps\world\ - to \xVision\BACKUP\Resources\bitmaps\world\
- all original shaders from \X-Plane 11\Resources\shaders\ - to \xVision\BACKUP\Resources\shaders\. xVision make backup ONLY for shaders it needs to work. Other shaders will be ignored.
- all files from \X-Plane 11\Resources\plugins\FlyWithLua\Scripts\ - to \xVision\BACKUP\Resources\plugins\FlyWithLua\Scripts\
- all files from \X-Plane 11\Resources\plugins\FlyWithLua\Scripts (disabled)\ - to \xVision\BACKUP\Resources\plugins\FlyWithLua\Scripts (disabled)\
If you have FlyWithLua plugin installed:
Service directory "LAVA" creates as a result of Vulkan shaders preprocessing.
The results of initial backup procedure and shaders preprocessing will be displayed in a program log:
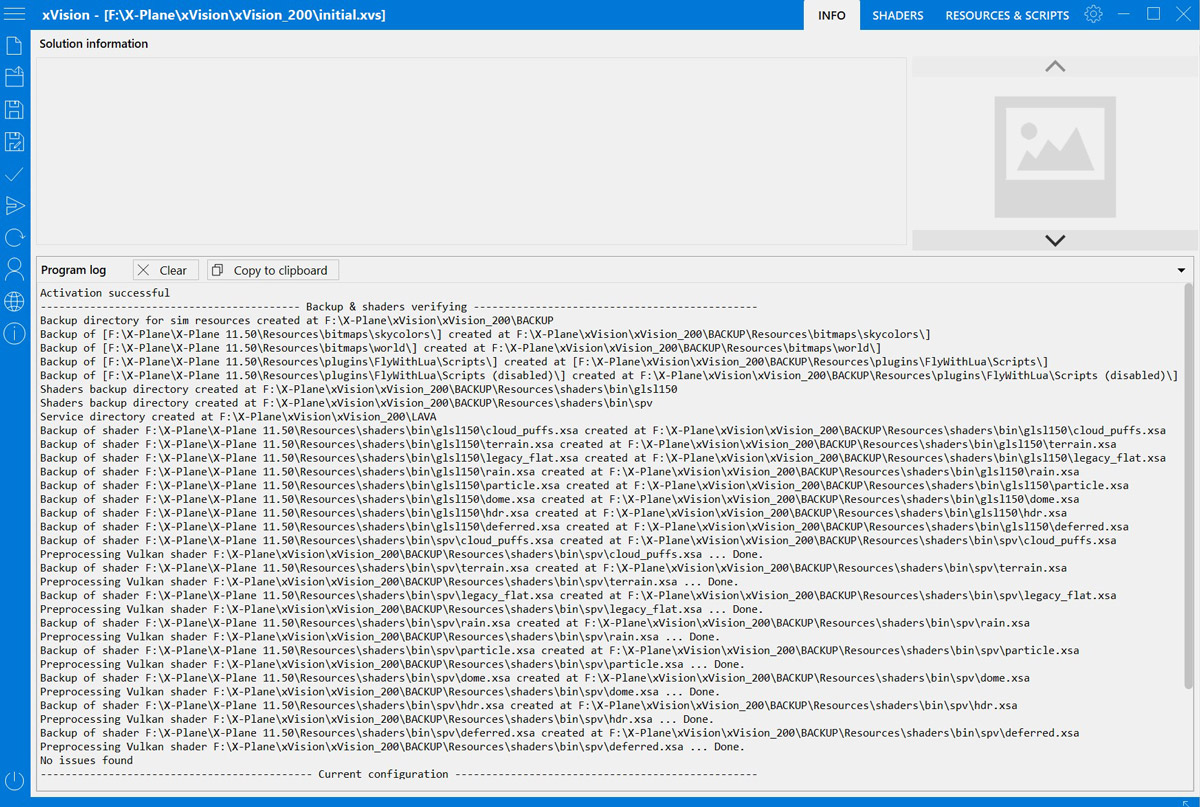
Please do not delete or modify contents of BACKUP directory in your xVision installation! Or you will loose ability to restore original sim files!
5. Uninstalling
Since the xVision tool makes changes to visual resources and shaders of X-Plane it's important to restore them to original state before tool uninstall.
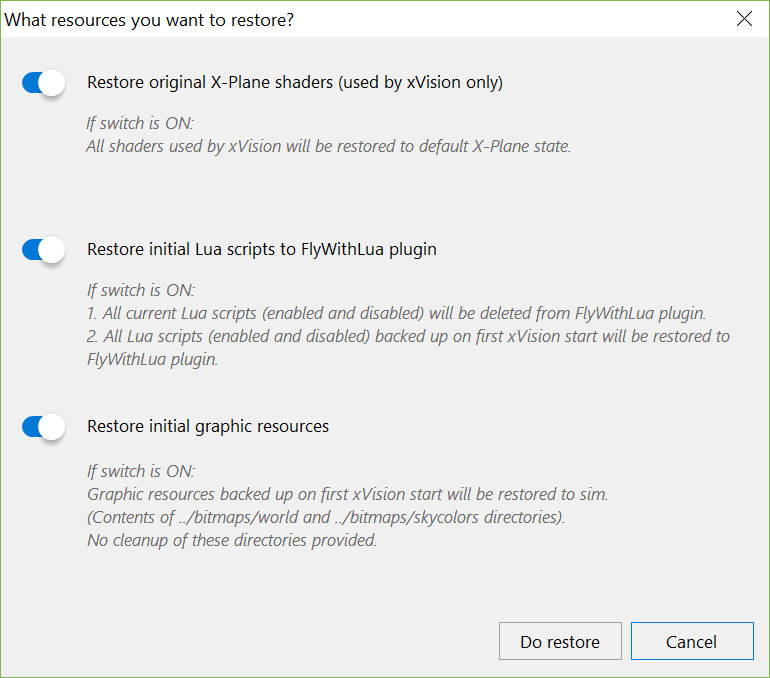 1. Use "Restore from backup..." menu command. Choose switches according to your need (all switches have the appropriate hints) and press "Do restore" button.
2. Delete xVision directory.
Keep in mind that xVision will restore the selected resources to the state in which they were first started. Manually resources installed later can be lost.
Before restoring resources and shaders from backup you should close X-Plane.
Important! If you have Lua scripts not reserved at first backup, please backup it manually before restoring scripts. The tool will warn you about it.
6. Upgrading notes
When you upgrade or downgrade version of your X-Plane the default sim shaders may change. At start tool detects this and ask for your permission to delete outdated shaders files from the backup.
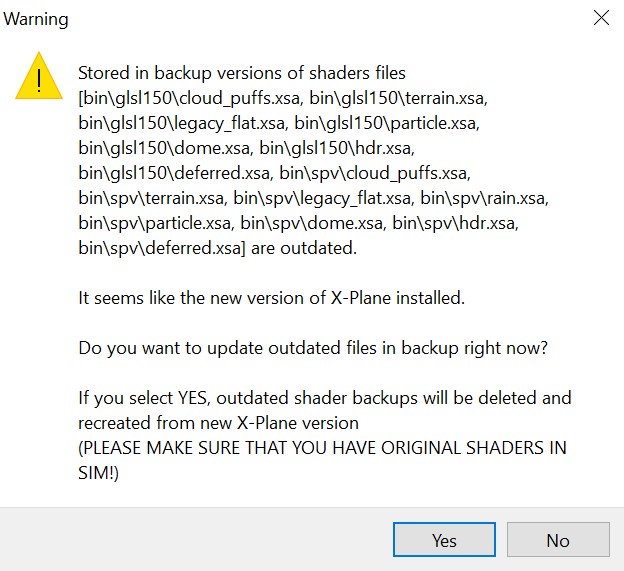
If you select "Yes", outdated shader backups will be deleted and re-created from the new (upgraded) X-Plane version. It takes considerable time.
Please note that the list of available tweaks/parameters may vary for different versions of the X-Plane. xVision has server-based logic for most of the tweaks and adjustments: all required settings for the current version of the simulator should be made by the tool automatically (intenet connection required).
In some cases, you may need to upgrade the tool itself (install package). When a new version released, compatibility issues and upgrade procedure are described on the Release history page of the site.
7. What are solutions?
If you have ever developed your X-Plane visuals, you are well aware that good results can be achieved by using a)good textures b)FlyWithLua plugin (a real masterpiece in the X-Plane world!). xVision offers you a fast and convenient way to control these resources without manually editing/copying files or any other confusing rubbish.
And in addition, the tool allows you to make adjustments to X-Plane shaders.(Shaders are programs running on GPU which tell a computer how to draw something in a specific and unique way.) xVision modifies X-Plane shaders which are used by sim to render scene. These modifications become active only at next start of sim, so changes can't be visible "on-the-fly").
Thus, each xVision solution consists of three interrelated parts that affect the visual component of virtual flights: textures, Lua scripts and shader tweaks.
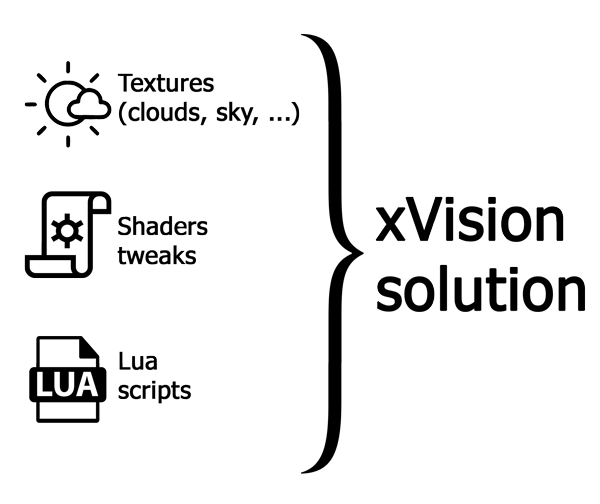
All three components could be understood as a coherent whole (package). You can download a solution from the/a file, save, rename, make your own packages and share your work with community.
Each solution is a single file, not a bunch of different files that should be installed in different directories with different conditions.
xVision tool distribution package contains a couple of ready-made solutions. So you may start using it very easily: open solution (file with *.xvs extension), and apply it. Just two clicks :)
You don't need start xVision tool every time you start virtual flight. After applying solution the tool makes persistent modifications in shader files and resources which are used by X-Plane later. But keep in mind that every time you need to use new solution, you need to close sim, apply solution with the tool and then start X-Plane.
8. xVision user interface. Working with solutions.
All basic commands are grouped in the main menu on the left side of the tool window. There are three main interface sections: "INFO", "SHADERS", "RESOURCES & SCRIPTS" which can be accessed using the corresponding buttons in the title bar of the main window.
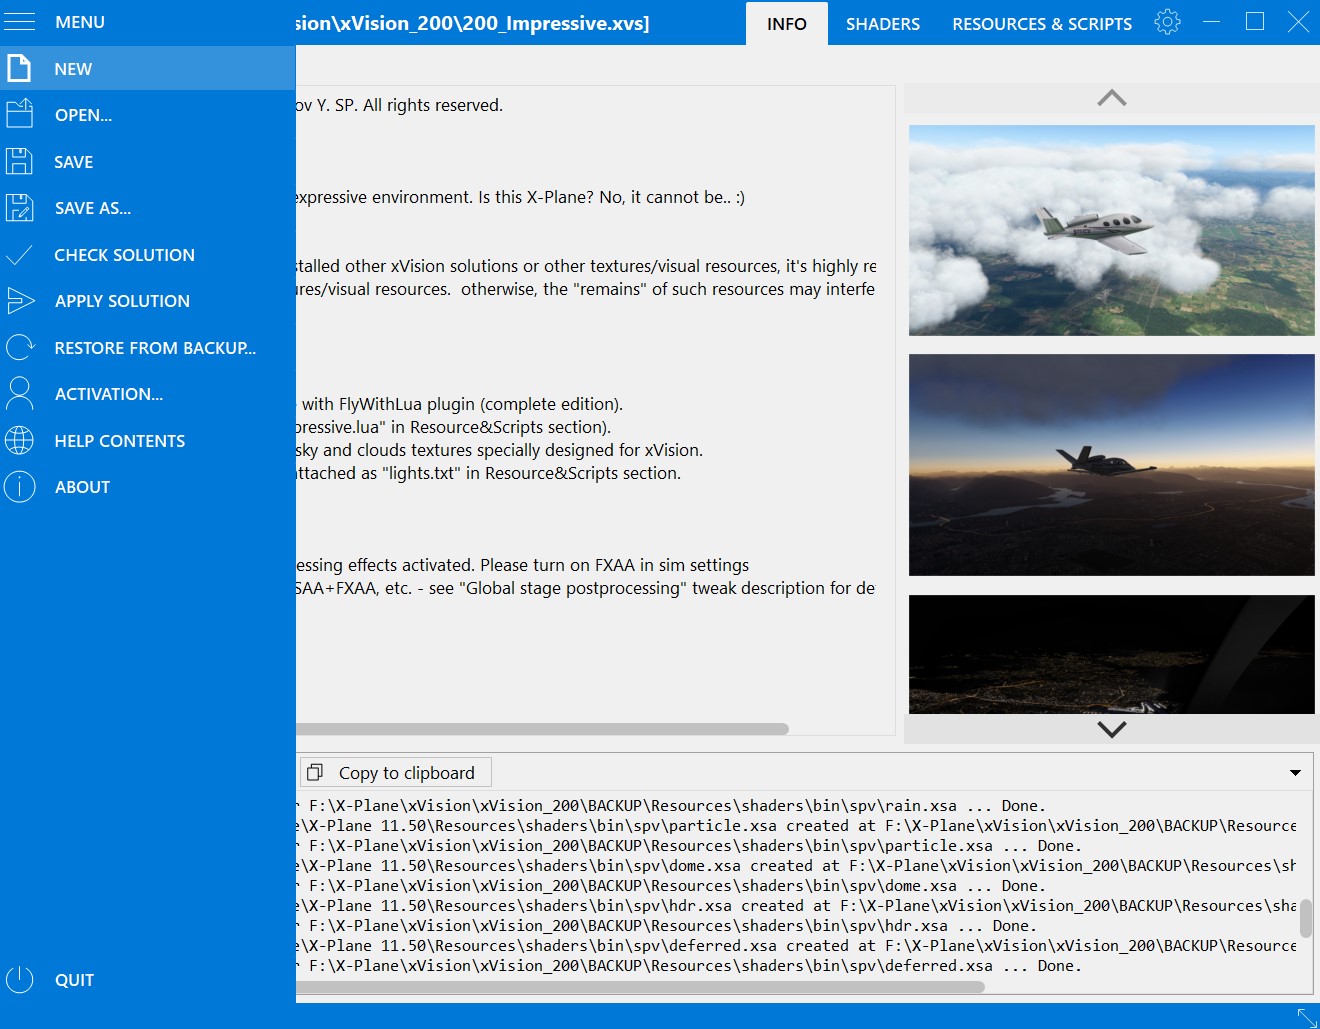
The program log, which contains text messages, is located at the bottom of "INFO" section. This section also contains a comment section and three illustrations/screenshots. Put your notes on the solution here and download the screenshots to illustrate this.
Command "Check solution" allows to validate tweaks parameter values and resources installation paths (see below).
Command "Restore from backup" allows you to restore resources and shaders to the state they were at first tool start. Please see chapter 4. Uninstalling for details.
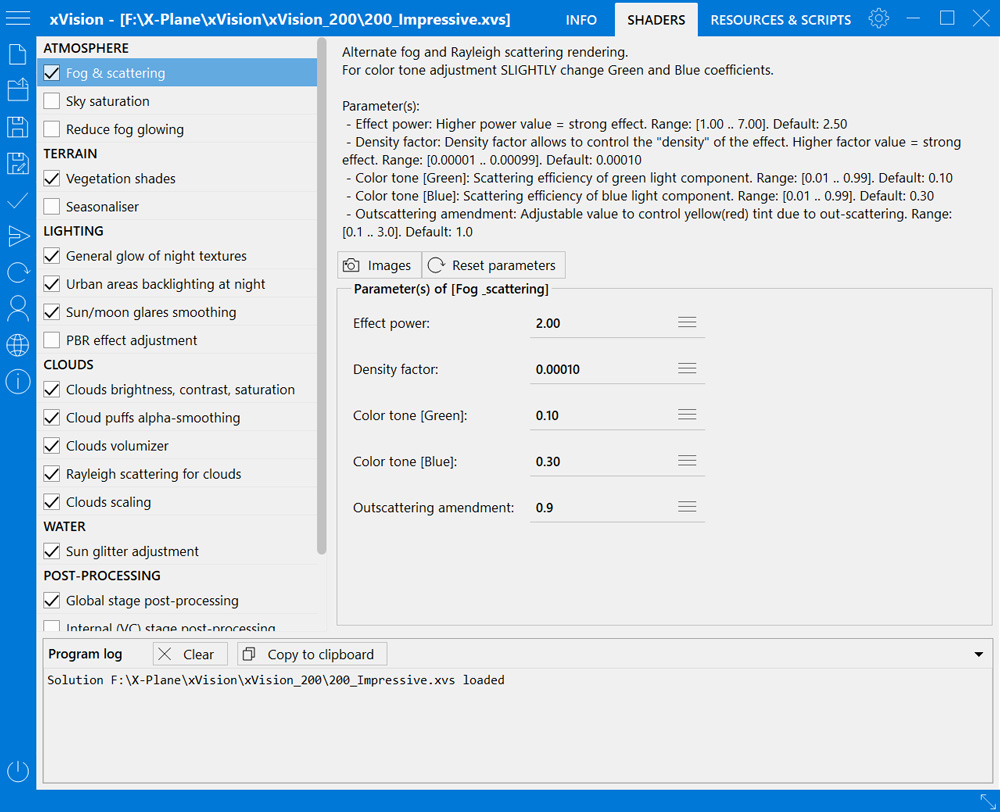
"SHADERS" a section allows you to manage all shaders, post-processing tweaks and custom patches. Activation of each tweak is performed by its checkbox in the left tweaks listbox. If checkbox is not checked, the tweak is not applied.
All tweaks and tweak parameters have a detailed description and many of tweaks are illustrated. Use "Images" button to get tweak illustration online (internet connection required).
Tweak parameters which are in most cases are real numbers, can be edited manually or by using mouse wheel or Ctrl+mouse wheel (increasing/decreasing values). Use "Reset parameters" button to set all tweak parameters to default values.
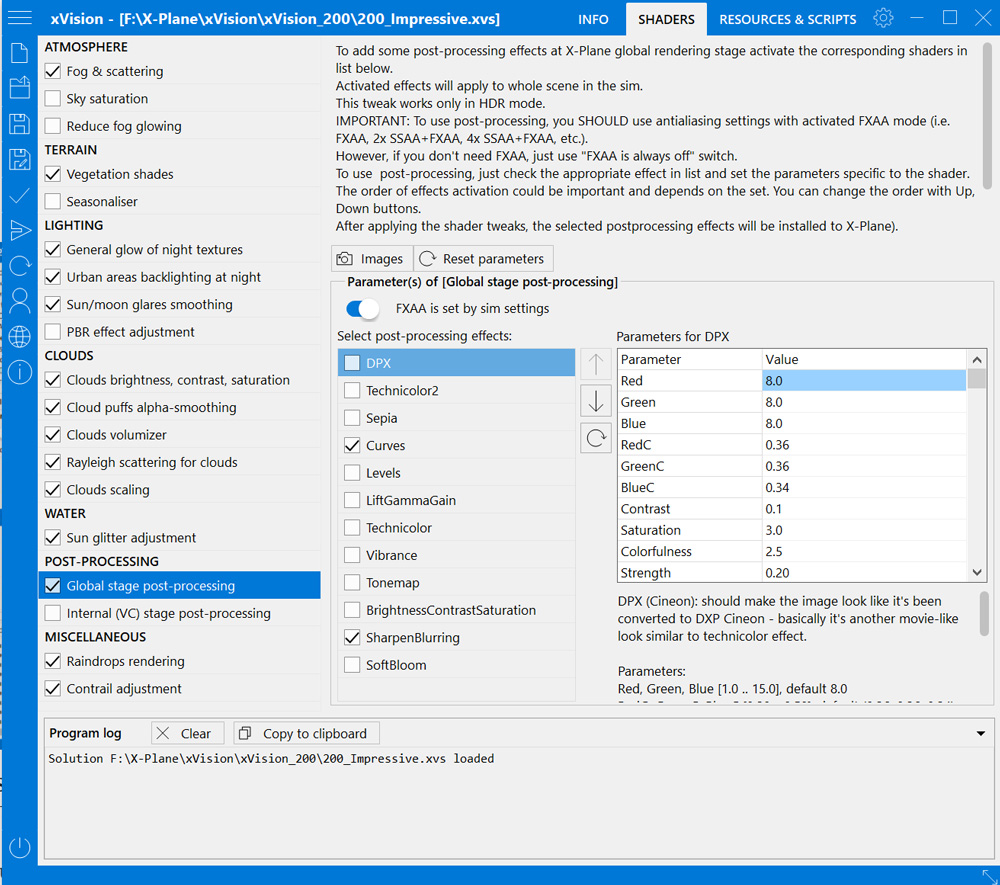
Post-processing tweaks are containers that group different post-process effects. If you want to add these post-processing effects to sim, activate the post-process tweak itself and check desired effects in its list. The order of effects activation could be important: you can set the order by using Up, Down buttons. Each effect is documented and has its own parameters that can be restored to default values.
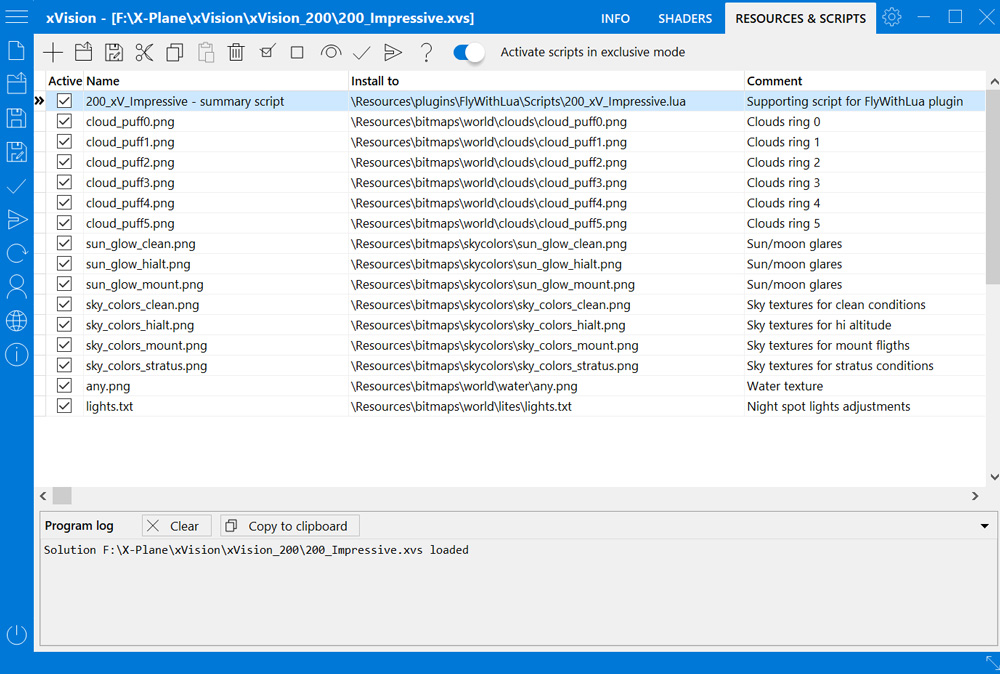
Section "RESOURCES & SCRIPTS" allows you to manage scripts and resources that will be installed to X-Plane when solution is applied.
The list contains four columns:
- activation checkbox,
- resource name,
- installation path and comment.
Deactivated positions exclude from solution applying.
Name is an arbitrary name used to identify resource.
Install path contains the directory and file name (relative to main X-Plane directory) where resource will be installed.
For example: if resource path is "\Resources\plugins\FlyWithLua\Scripts\xVnatural.lua" and your sim is imstalled to "D:\X-Plane", file xVnatural.lua will be installed to "D:\X-Plane\Resources\plugins\FlyWithLua\Scripts\xVnatural.lua".
Toolbar at the top of section includes commands to
- add multiple files by directories browsing;
- download resource to selected position from file;
- upload resource from selected position in solution to file;
- cut/copy/paste/delete resources;
- view resource in solution (if they are texts/lua scripts or pictures);
You can select multiple positions in resource list by using Shift+arrows keys or Ctrl + mouse click.
"Check resources" command button allows to validate resources list. xVision can detect duplicates error (when different resources installed to the same file) and cases when resources will be installed to the directories that not backed up by tool.
In such cases you'll get warnings in log like this:
Resources validation results:
	ERROR: resource [xVnatural - summary script] has the same install path
	WARNING: resource/script [lights.txt] will be installed in a directory that is not backed up by the xVision
WARNING: Resources have some problems. Please see the log
Resources selected in list can be installed to sim separately from the whole solution. (Use "Install selected resources" button.)
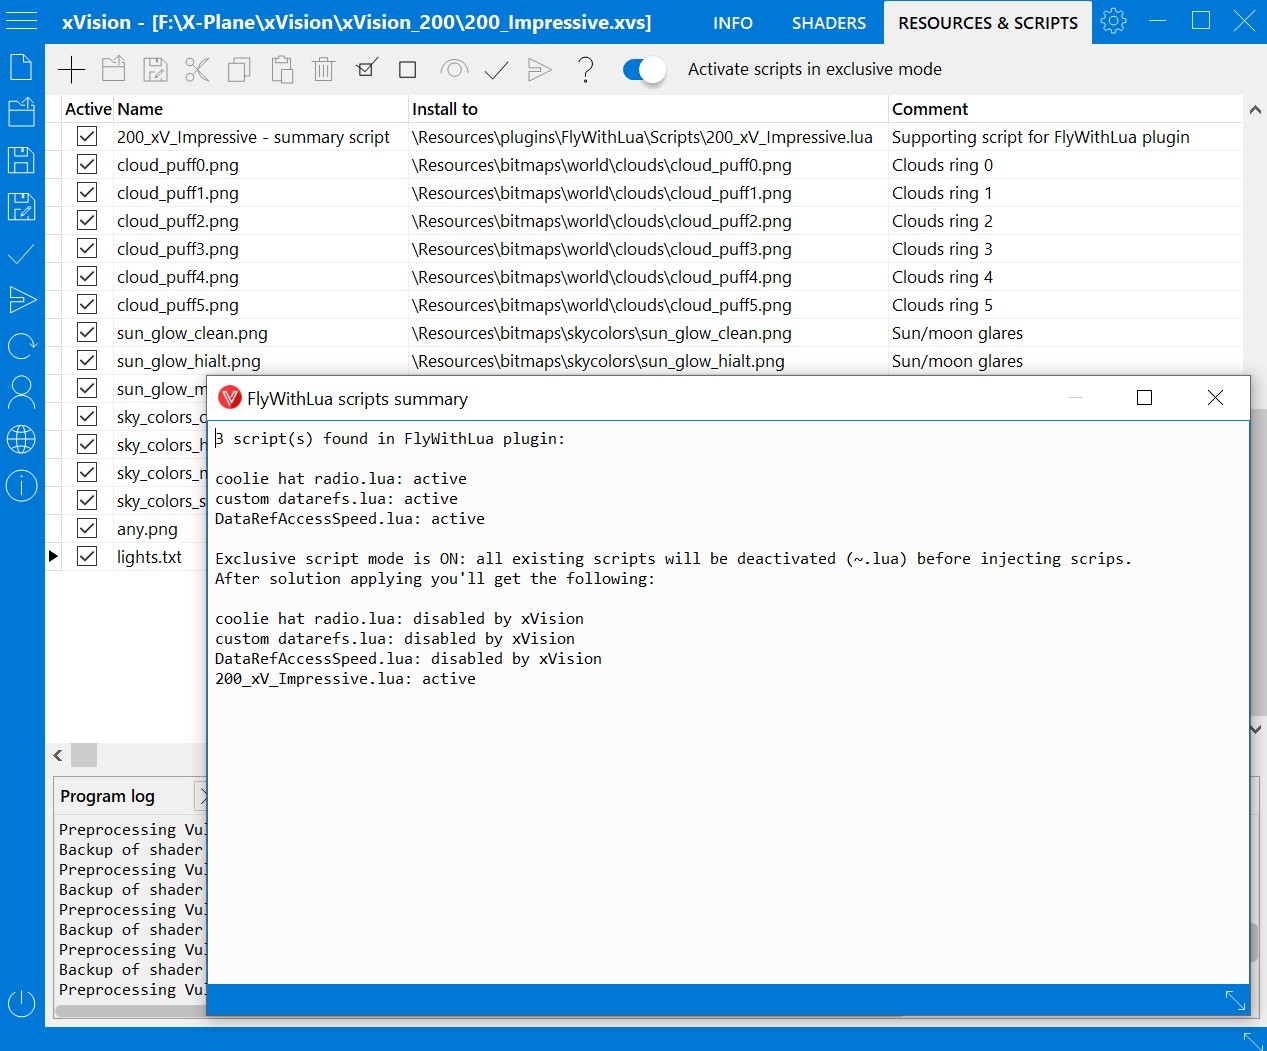
"Activate scripts in exclusive mode" switch (if it's ON) allows you to disable all existing FlyWithLua scripts before solution applying.
Disabled scripts still remain in FlyWithLua script catalog, but their extensions change from "lua" to "~lua" (and FlyWithLua plugin ignores them).
To predict what will happen with already installed Lua scripts after solution applying, use "View details" [?] button on the left next to the "Activate scripts in exclusive mode" switch.
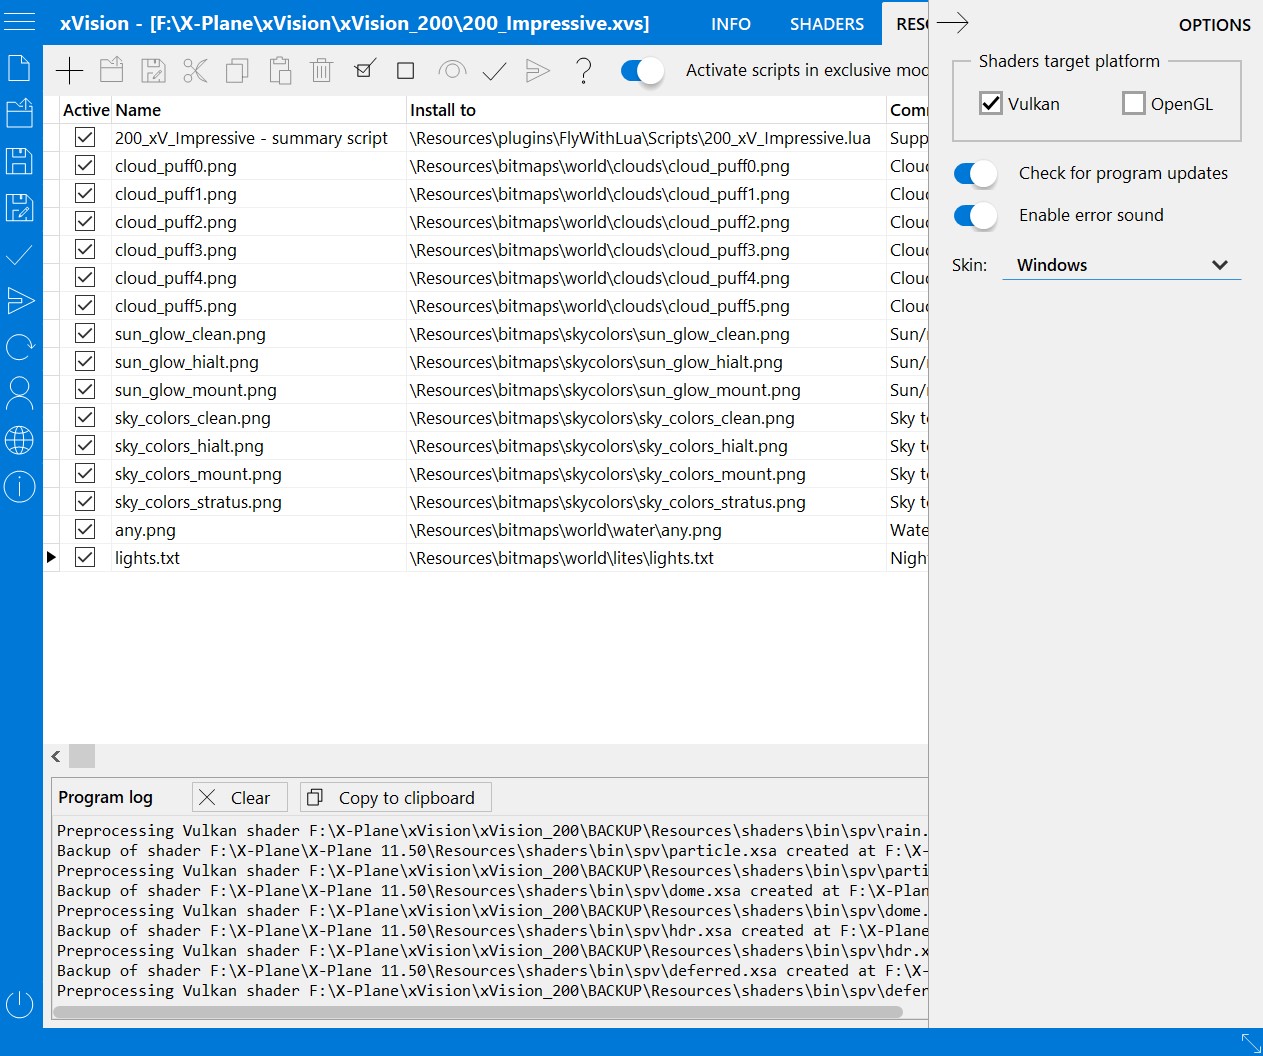
There is an "Options" button next to "RESOURCES & SCRIPTS" section on the titlebar of main tool window.
Options section allows to change UI skin and turn on/off errors sound and updates notifications.
Here you can switch target shaders processing to Vulkan or/and OpenGL.
9. Troubleshooting
This chapter provides a general overview of troubleshooting software problems.
1.
I get errors "ERROR preprocessing Vulkan shader..." and popup messages at first start of xVision
 Solution:
Please check that Microsoft Visual C++ 2015-2019 Redistributable (or later) package installed in your system.
You can download it here: https://support.microsoft.com/en-us/help/2977003/the-latest-supported-visual-c-downloads.
(Or use VC_redist.x64.exe file in xVision distibition archive. It's Microsoft Visual C++ 2015-2019 Redistributable (x64) 14.28.29325) for English language.)
2.
I get errors like "ERROR processing solution: source file X:\XVision200\BACKUP\Resources\shaders\terrain.xsa not found" or
[shadername] "is not original X-Plane shader".
Solution:
[shadername] "is not original X-Plane shader".
Please follow these steps:
1. Close xVision.
2. Refresh your shaders in sim to default state. Use standard X-Plane installer/updater. For Steam: verify integrity of your X-Plane installation as shown here: https://support.steampowered.com/kb_article.php?ref=2037-QEUH-3335 .
3. Start xVision - it will recognize the default shaders and create the backup again. It may takes considerable time.
4. Open your solution and apply it.
5. Make sure you have no ERROR messages in xVision log.
Appendix A: Detailed list of tweaks with descriptions
Please be advised that list of shader tweaks and parameters may differ for different versions of the tool.
Here you can get the actual list.